The new LUFA bootloader
So I’ve been feeling a little down lately, saddened by my lack of enthusiasm for developing new projects. Stuck in a rut, that sort of thing. A few weeks ago I thought I’d try something simple, new and fun to rekindle my love of developing — and who doesn’t love a good joke?
A long, long time ago I was thinking about Bootloaders for LUFA. Right now there’s three in the current LUFA distribution:
- A DFU class bootloader, compatible with Atmel’s FLIP software, or the open source dfu-programmer code. Fits into 4KB, robust, EEPROM programming support and popular. On the downside, you need special host software and drivers.
- A HID class bootloader, compatible with a modified version of Paul’s excellent cross-platform TeensyLoader command line utility. Fits into just 2KB on some devices, requires no non-standard drivers but it doesn’t really do EEPROM (unless you count my hack to sort of, kind of do it).
- A CDC class bootloader, compatible with AVRDUDE as it implements the fairly popular AVR910 protocol. This is the one appropriated (and modified) by Arduino for their Leonardo board, and the one everyone else seems most eager to use in their own creations. Sadly due to Windows being Windows it needs a special driver file which requires a paid signing certificate as of Windows 8 to function.
But a while back, I had plans for a forth. A crazy, crazy idea: bootloading…over MIDI. Actually, MIDI bootloading turned out to be a rather old idea, and one that’s actually popular in a number of commercial instruments, using MIDI SYSEX commands. My idea was to encode the data as a series of note commands with hard-coded delays — that way the end-user could reprogram a board by literally just playing a MIDI file sent from the manufacturer, with no device-to-host feedback being required (thus no special host software). No drivers needed either, since all modern operating systems include them just like they do for a number of other standard classes.
Unfortunately, revisiting this the other week I was left disappointed; it seems Windows 7 simply doesn’t do proper MIDI mapping to hardware MIDI devices any more, and I’m not the first one to be disappointed by it. Of course you can use dedicated software for it, but that would take away from the simplicity of the implementation. Bang goes that idea.
However, as OK Go say, All is Not Lost. I had another idea up my sleeve; none of than the humble Printer class. Yes, I’m being totally serious. Let’s skip ahead a bit and start with the end result:
That might look like just a humble printer from the 1980’s, but in actual fact you’re looking at what might just be the first bootloader-over-USB-printer-class in the world. Need to reprogram a device? Just “print” a new HEX file to it. Whee.
That’s not to say the journey was easy; first I had to re-visit the specifications for the USB Printer class. It’s actually a deceptively simple specification, if only because it’s just like the Mass Storage one: a thin wrapper defining a generic data transport and a few error feedback mechanisms, and a “data sent is implementation defined” style catch-all. That’s fairly common in the USB world for class specifications – in many cases it’s only the transport that’s covered, and the actual encapsulated data is just whatever the hell the host and client agree to send to each other. In the real world, that can mean PostScript, Epson Command Language, pre-rasterized images, who knows.
So, first I had to make the host see a USB printer device. That’s just a matter of setting the Device Descriptor’s Class, Subclass and Protocol fields, plus a basic implementation of the status and error reporting control requests. I really, really didn’t want to mess with custom printer drivers, so originally I just use my own custom IEEE 1284 description string, and forced the driver manually under Windows to one of the basic generic PostScript drivers it has inbuilt, since that’s a well known standard printer language.
Let me tell you; PostScript is NOT for the faint-hearted. I was hoping to see something vaguely structured with the plain text of the printed source visible so I could pick it out, but alas the received data was just a mountain – seriously, several kilobytes worth – of pure PostScript craziness with no obvious payload in sight. Luckily thanks to receipt printers and ye-olde daisy-wheel printers of yesteryear, Windows also ships with a “Generic Text-Only” printer driver that does away with all the crazy and just outputs exactly whatever text you print with no formatting at all. Success!
Well, partially – with the new driver, I could get a completely plain text representation of whatever I printer from the host (pictures didn’t work, obviously). However, I still wanted the drivers to be plug-and-play, since I wanted the end-result to be as streamlined as possible. After a bit of searching, I ended up finding the answer buried on (embarrassingly) a Microchip support forum post. Plugging in the magic IEEE 1284 identification string now gave me an automatically installing printer under Windows 7 with the desired generic text only driver.
But, what to do now? Should I invent a crazy command format, and have users “print” it to the bootloader? Is there a better way? Of course there is:
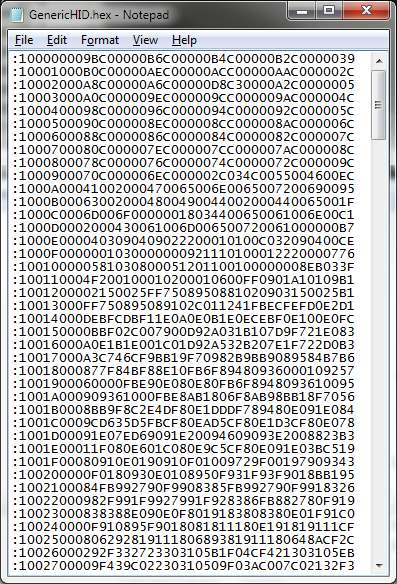
Yup, good old Intel HEX. In the AVR world (and in most embedded engineering circles) HEX files are king, and the file format is simple enough that making a parser for it isn’t too difficult. It’s also the native output format for most AVR build scripts and tools, and the one users are more familiar with.
I admit, the end result parser isn’t the prettiest code I’ve ever written, but it is (arguably) the most amusing. You’ve heard it here first folks; the world’s first AVR bootloader where you just compile, then print your HEX file in Notepad. On Linux, you can just cat the HEX file to the low level LPR printing subsystem to re-flash your board.
Sometimes the best jokes are the ones that turn out to have a somewhat practical use.


Nice idea!
Have you already thought about a MSD bootloader which appears to the computer as a regular USB memory stick, and where the microcontroller gets programmed when the user drops a file onto the device in Windows Explorer?
Something like this: http://emerythacks.blogspot.co.at/2012/12/usb-mass-storage-bootloader-for.html
I’ve been thinking about it – I need to read over the FAT specs to work out how to emulate the filesystem correctly (and strip off the written filename to leave only the comments) but I think it could be do-able. Perhaps I’ve found my next project :).
– Dean
Simply clever. Will have to road-test it soon.
[…] my last post detailing my latest and greatest abomination to the world of embedded engineering, Markus asked if I had considered making a Mass Storage class […]
FAT12 is simple enough for a microcontroller to easily handle and pull a file out of, but the problem is there needs to be enough storage space to hold the whole file.
A hex file will be much larger than the actual binary that ends up burned to the chip.
The reason the whole file must be stored (and also the whole filesystem metadata) is that the microcontroller has no way to know what order the pieces are being written in and how they fit together. The OS could easily write the 2nd half of a .hex file, then go back and write the first half, and in order to process it cleanly you have to just buffer the data until the file’s there and you can “remount” it from the uc.
Using a printer driver enforces that the file is streamed beginning to end, and that the partial program can begin to be written to program flash as soon as it’s received.
This is so cross-platform, there is literally nothing you have to put on your platform, as everything is already there on any system that supports USB. It’s cross-platform like nothing. Literally.
Ha ha ha, ha. It is funny and cool! Your code is the bomb.
too good!!
On mass storage bootloader
While in theory BradN is correct, you might
have to deal with blocks written in any old order,
in practice most of the time blocks are written in sequence. The mass storage bootloader somebody did for the Stellaris Launchpad just assumes that it will get blocks in sequence, and it works.
http://emerythacks.blogspot.com/2012/12/usb-mass-storage-bootloader-for.html
If you want to be extra careful you could add error checking to check for out of sequence blocks to signal an error.
I like the printer driver loader idea.
I have a follow-up with a Mass Storage bootloader implementation here: http://fourwalledcubicle.com/blog/2013/03/the-new-new-lufa-bootloader/
– Dean
BradN,
If it’s a HEX file couldn’t you parse for start codes and write it to memory line by line as it came in while caching any lines that where split across chunks and writing them when the other half arrives?
you would have to make sure the addresses where absolute and not offset based though so yeah.. would not work with every hex file.
It would be cool if someone made not a bootloader, but a standalone AVR programmer on top of this.
[…] créateur du projet LUFA (Lightweight USB Framework for AVR), Dean Camera a mis au point un hack qui permet de flasher une puce AVR en imprimant des données sur celle-ci […]
Exelent ! Can you post a scheme or pictures of the real thing please ? For the newbies.
The only schematic you need is in the AT90USB* and ATMEGA*U* datasheets, in the USB section — this bootloader is entirely software based, and only requires a USB AVR and associated power/USB circuitry. You can purchase ready-made compatible breakout boards from PJRC (www.pjrc.com), Micropendous (www.micropendous.org), Arduino (the Leonardo, not the earlier boards) or a host of other vendors.
– Dean
Seriously ?!! It’s so cool, you are amazing, thank you !
This reminds me of an HP laser “soft” printer I use to have. To get the printer to work on Mac, Linux you first needed to “print” the firmware to the printer. The firmware needed to be printed/written to the device every time it was power cycled. The Windows driver took care of the firmware printing behind the scenes so its likely that a lot of users never even knew what was happening.
Hey Dean! I am commenting on a very old post for the context…
I would like to ask you about the MIDI route… You mentioned you never really went forward with it, but I wonder how hard would it be to actually implement it? I know it sucks with Windows, BUT it would be a perfect route to allow uploading from an iPad, via the Camera Connection Kit cable. iPad uploading would be huge (as so far the only way to do it is via bluetooth or doing the *huge* overhead of joining the MFI program and roll out your own certified cable) – specially for the education sector – **lots** of schools have iPad as their primary tool for STEM.
Would you be willing to give some directions if I want to try to implement it myself, or share some previous code (if you ever developed anything before giving up)? Also, would you be interested in doing the development yourself, if I could found it?
Anyway, a huge thank you for all the amazing work you have been sharing so far!
EDIT: “Also, would you be interested in doing the development yourself, if I could *fund* it?”
I had a quick looks around, but I’ll be damned if I can find my original attempt. In theory, it should be in the Git tree somewhere (most likely a Bootloaders/Incomplete/MIDI or Bootloaders/MIDI) around the mid 2013 timeframe, but a quick spelunking turned up nothing.
In theory you could do this one of two ways:
1) Have a bidirectional MIDI system, where commands are encoded either as MIDI notes, or control data. The host issues a command, and receives a response before proceeding to the next command.
2) Have a unidirectional MIDI system, where you just blast out commands with some good delays in between. This is slower and less safe than option #1, but gives you that “just play this MIDI file and wait” reprogramming ability I was originally shooting for.
I think #1 is better if you have access to a native MIDI API on the host (iPad, PC, etc.). You should start from my existing simple HID LUFA bootloader, and splice in the descriptors and MIDI code from the Demos/Device/ClassDriver/MIDI example. You’ll need to define a command set for “program flash block” and similar, but it actually shouldn’t be a lot of work on the embedded side at all.
Re: doing it myself; I don’t have a ton of energy these days for hobby EE work (now I do complex firmware/software development for a living, all I want to do each night is watch TV and sleep!) but as I said, it’s not a lot of work. If you’re willing to write the front-end for at least one platform and open source it, I’d be happy to give it a go.
– Dean