Our CSE3PRG Project – Build a Neuron!
I thought I’d take the opportunity to show off my CSE3PRG programming project to a wider audience (all three blog readers) than just the tiny presentation room that we presented it in to the judging panel last friday. Here it is in all it’s “glory”.
The programming project is designed to give students a real-world experience of developing a project. Several people (in our group, seven, of which I knew only one) are placed together in a team and are allocated a project to create, on behalf of a “client”. We were then required to allocate out team roles such as coding, documentation, testing, etc. to the group members, and then develop the project from start to finish. Each week, our progress was monitored by our “client” (a tutor from the University) who would give feedback on the progression. At the end of the 10 weeks, we would then present our application as if we were trying to sell it to the judges in a presentation room.
The project we were taked to write is called “Build a Neuron”, and is designed to give Bio-science students an educational tool to test their learning as they study the body’s neurons (components of the brain). The requirements were to have several levels of varying difficulties, each with a set neuron the user was to build via a graphical construction screen, followed by a multiple choice quiz about that neuron which they must complete correctly to unlock future levels.
Due to some department screwups, my friend and I weren’t placed into a team automatically, and so we became the sole coders of the project in an existing team of 5 people in week three, giving us a three week disadvantage. Nevertheless, we managed to complete the project on-time, including bonus requirements.
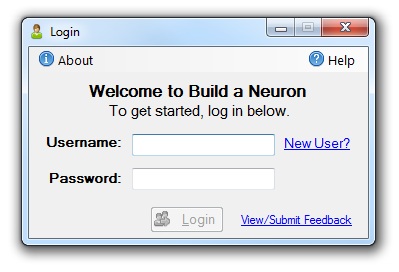
Here’s the first screen, the Login screen. This is where new users to the system can log in to resume their progress, sign up a new account, or leave feedback to the system administrator and other users. The player and data files are all stored in XML format, with the password being stored by their MD5 hashes for slightly better security than plain-text. Unfortunately we ran out of time to add additional hashing of the complete player files to prevent tampering, but this small step at least showed we had addressed the basic security concerns of players seeing other’s passwords.
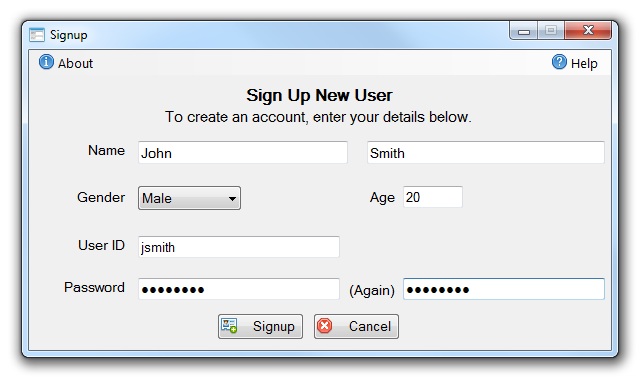
If a user is new to the system, they sign up a new account via the above screen. Here they are required to fill out all the fields, with the chosen username being used as the player’s XML data filename for easy lookup. Once the fields have been validated and no errors found, the user is them automatically logged in to the game and can start playing immediately.
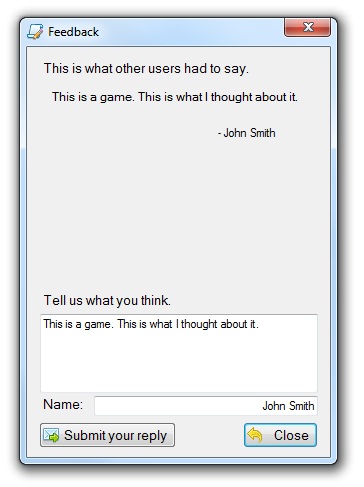
Logged in and unlogged in users alike can also leave public feedback via the Login screen if they wish, which is then presented to other users and the administrator when they open up the same Feedback screen. This would be a terrible idea for a real product as users can enter any profanity and garbage they wish, but it was a project requirement and so we implemented it as requested.
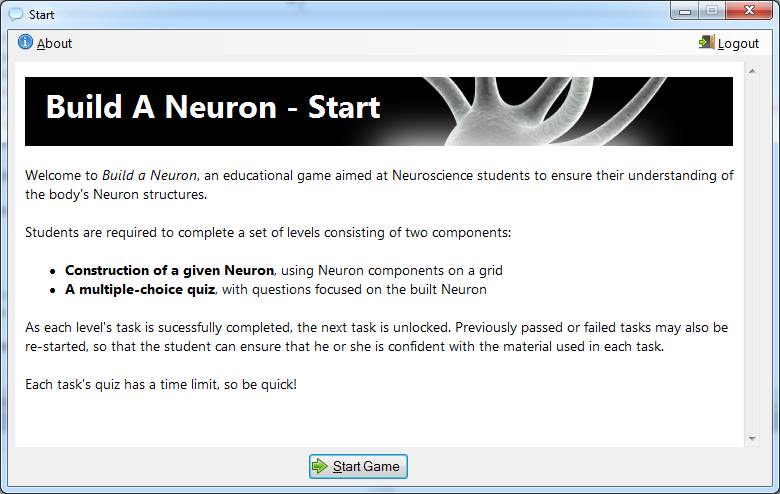
When logged in, the first screen the user is presented with is the Start screen (also a requirement), which details to the user what they will be required to do to complete the game levels. This was implemented by loading a HTML file into a Webbrowser component — all the game help files are implemented as HTML files, so that they can be viewed seperately to the game.
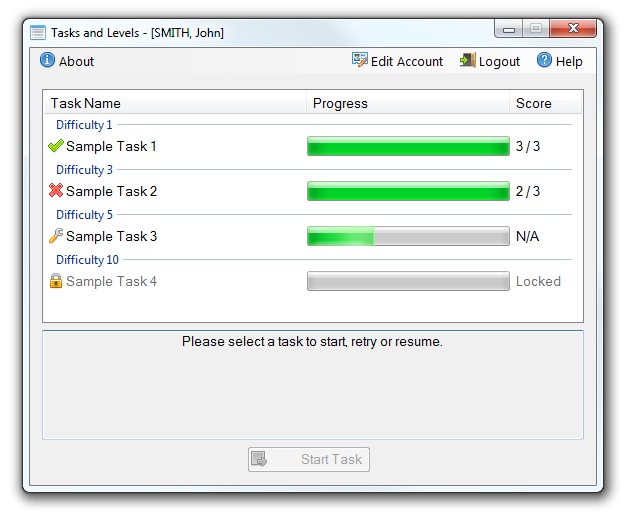
This is the tasks screen, as seen by a normal user once they have logged in and dismissed the Start screen. We opted for a ListView to present the levels and tasks to the user, as it already implemented grouping (for the levels) and allowed us to add in the extra colums for added detail to the user. We tried to make the system use only standard components in standard ways to make it all have the look-and-feel of a normal Windows applicaton, which contrasted with the other entries which all tried to go for the real “educational game” look (read: full screen, black background, etc.).
We had a bit of trouble here as I wrote previously, due to the lack of double buffering of the control as well as figuring out how to embedd the progressbars into the listview without resorting to owenerdrawing. This mean subclassing the control’s WM_HSCROLL, WM_VSCROLL and WM_PAINT events to handle the positioning and drawing of the controls.
As you can see here, we opted to keep things configurable — the administrator can set many or only one tasks for each level, with varying names, rather than fixing the game to only “Easy”, “Medium” and “Hard” levels. We also opted to use graphical icons to show off the status of each task, whether it be New, Completed, Failed, In Progress or Locked.
When a task is selected, it’s admin-set description is shown in the bottom box on the screen. Tasks that have been completed or failed may be attempted again to further the user’s knowledge in that task, and to unlock additional levels if the user has not previously completed the task successfully.
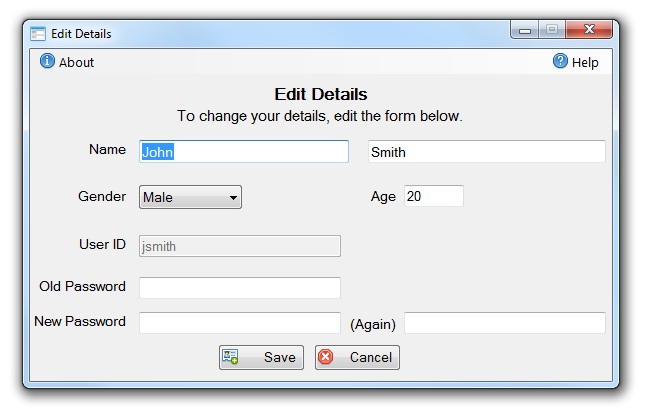
From the top menu in the Task selection screen, the user can edit his or her details using a modified version of the Signup form discussed above. Here as you can see, we elected to disable the editing of the username for two reasons: one, it complicated the code quite a bit to deal with the filename changes, and it causes the administrator to lose the only fixed reference of who’s who in the game.
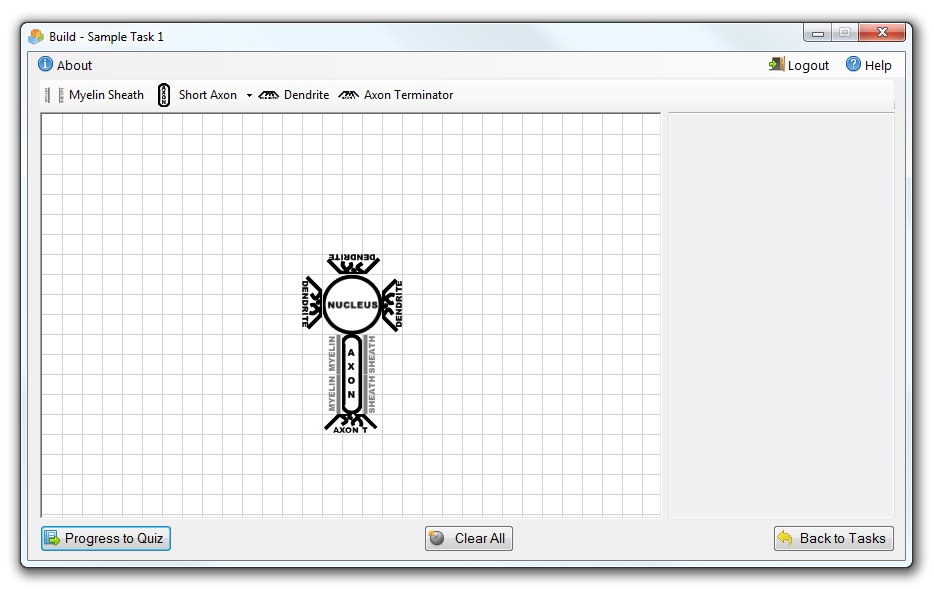
Here’s our Build form, the screen the user sees when they first start a task. Here they are required to build the Neuron set by the administrator, using directions/information given to them in the right-most pane. In this sample task, no information is given, but on a real task the administrator would populate this so the user is directed in what he or she needs to make.
Components are added to the build area by clicking them in the toolbar at the top of the screen. Similar items can be grouped like the Axons above in a dropdown menu, to reduce clutter. Once placed, the user can move the items by clicking on them and moving them to the desired location, or rotated by clicking and dragging the mouse. A right-click menu will also give all the manipulation options to the user for each object.
Centered on the screen is a fixed cell Nucleus which the user must build around. Placed objects are compared relative to this central object, so that the neuron can be compared (independant of orientation) to the one the administrator has build. All the object images here are placeholders due to copyrights — the real use of the app would have the administrator supply some proper object icons. The drawing here is done via a Panel (again subclassed to enable double buffering) with our own custom paint routine to draw the grid and placed items from the object list.
The player can choose to return to the Tasks screen at any time to begin another unlocked task, or log out to return to the Login screen. When either action is chosen, the partially built neuron is saved and restored when the task is resumed.
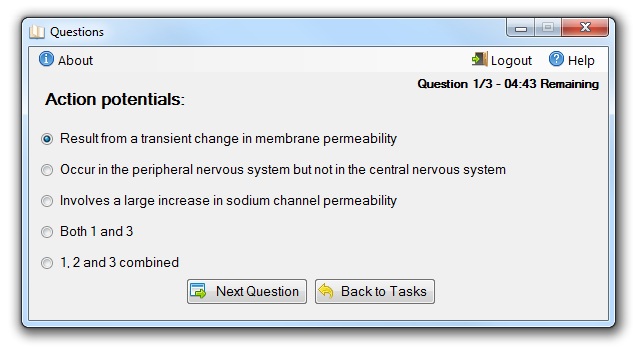
When the neuron is completed and is correct, the task quiz screen opens. Here the user is presented with a series of multiple choice questions which he or she is requried to answer correctly to complete the task. The number of questions and the time the user has to complete the quiz is variable, and is set by the administrator. Each level can have a pool of questions with associated keywords set, and questions with keywords matching those for each task will be randomly selected each time to ensure that the quiz is different each time the user attemps the task.
Like in the build screen, the user can log out or return to the tasks screen, and the quiz progress (including remaining time) is saved.
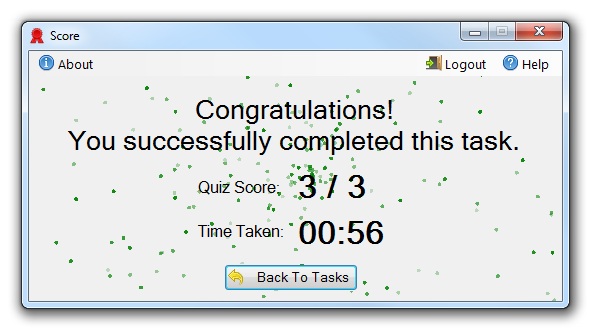
This is the Score form presented to the user when the task questions are completed, and all are correct – the background is animated when shown to display a starfield of green, and the text displays the overall score and time taken. If the task is successfully complete like the case here, the next task (if any) in the Tasks screen will be unlocked so that the user can begin it.
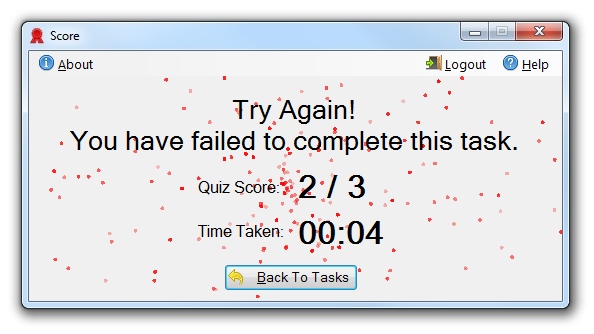
Here is the same Score form, when the player has failed the task. If the task has not yet ever been completed successfully by the player, the next task will not be unlocked and the user will have to try to complete the task again.
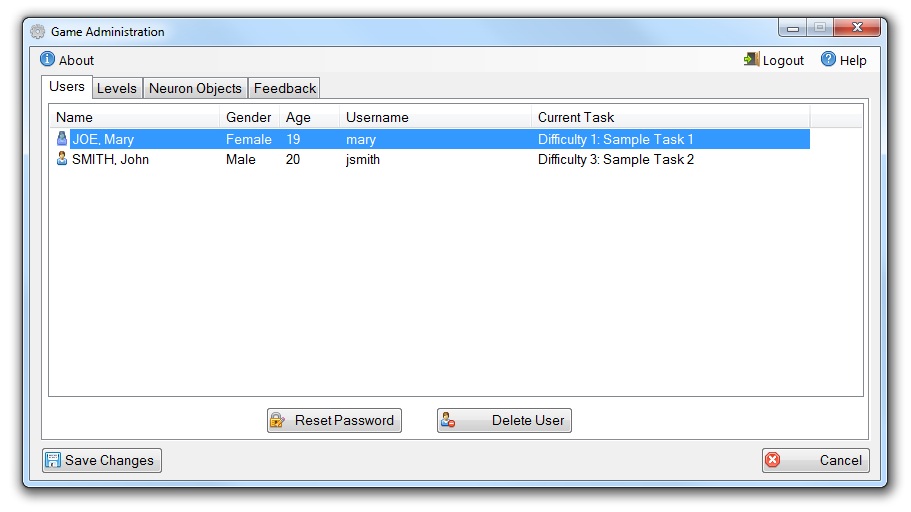
By default, the game accepts the administrator login credentials of “admin” and “admin”, for the username and password respectively. Once logged in, the administrator can then use the Edit Details screen to change the password to something more secure. On the Tasks screen, the administrator is able to play any task at any time without having to unlock tasks first, and can also access the Administrator screen (shown above) from the top menubar on the Tasks screen.
The Administrator screen here is split into seperate tabs for each of the relevant game aspects. The first tab deals with the users of the game, allowing the Administrator to monitor the players and their progress, delete unwanted accounts and reset the password of any account back to a default of “password”.
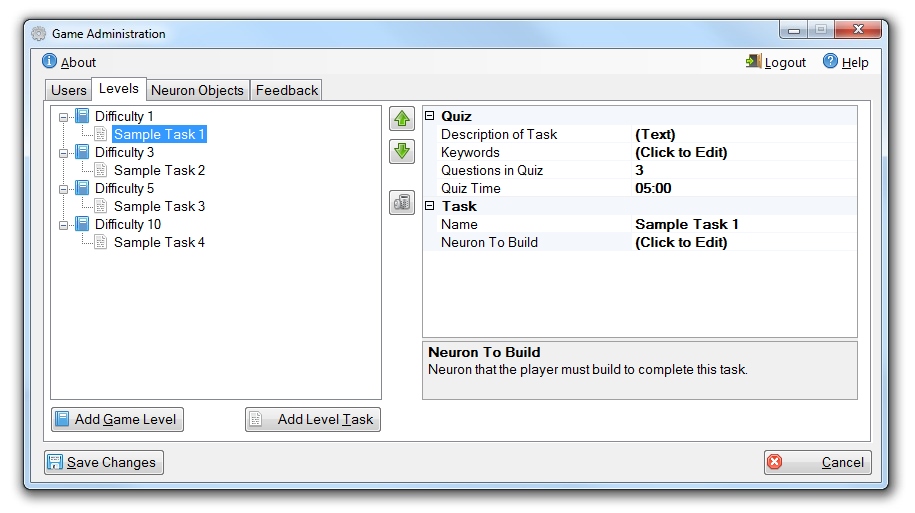
The second tab concerns the game levels and tasks. We’ve opted to use .NET reflection here to reflect on the live game classes in memory, making our own custom UI editors and data converters to give a very easy-to-use administrator interface (can you tell this is the part I’m most proud of?). When levels and tasks are selected, their details can be edited by the panel on the right, with a small help blurb appearing for each propertly as the user selects in in the grid. Levels and Tasks can be reordered, deleted and created using the remaining buttons in the UI.
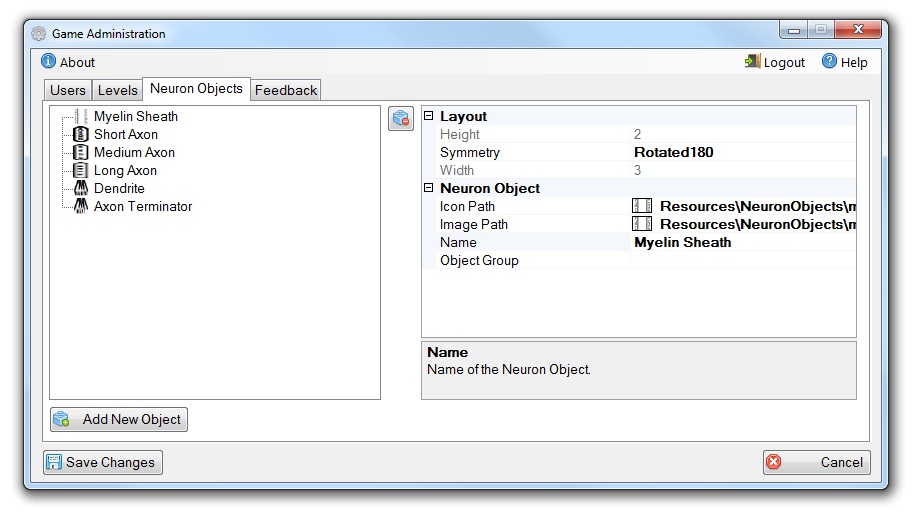
This is the third administrator panel, dealing with the objects which are available in the Build screen to the user for the creation of each Tasks’ neuron. Objects can be added, deleted and their properties set using an interface very similar to the Level/Tasks edit panel.
As many objects have a degree of symmetry (for example, round nucleii or long axons), it is often the case where the user builds a neuron which is visually correct, but electronically dissimilar due to a visually symmetric object being rotated a multiple of 90 degrees from the reference neuron. To combat this, each object can have its symmetry property set to indicate which orientations the object can be rotated to and still remain visually identical. This wasn’t strictly a requirement, but it certainly helps when playing the game and makes it much more intuitive to the user when constructing the neurons.
The image used in the construction grid and the icon used for the object in the toolbar can be set independantly. This is due to the image scaling used — many objects simply just don’t scale well to a 24×24 pixel grid, so we allow the administrator to supply alternative icons for each object if he or she wishes.
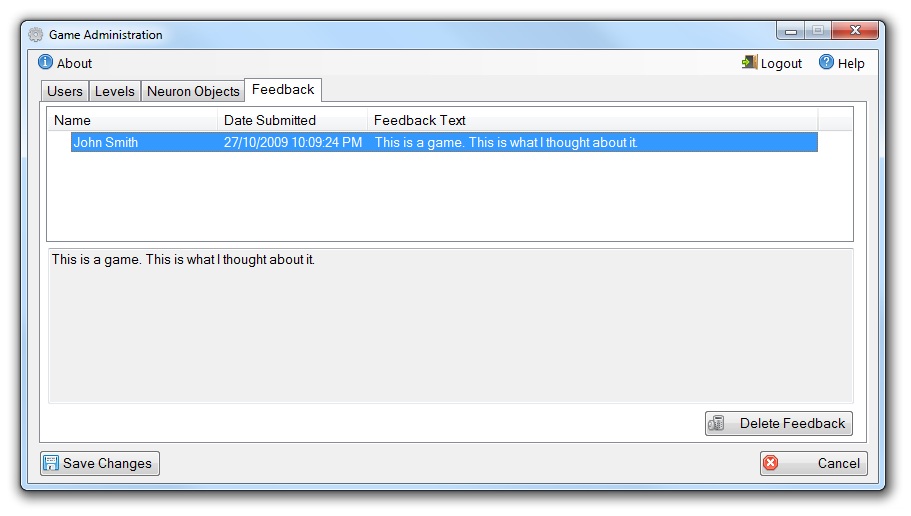
This is the last Administrator panel, dealing with the feedback left by users. When an item is clicked, the full feedback is shown in the lower panel. Submitted feedback can also be deleted by the administrator here, if required.
Well, that’s pretty much it – seven weeks hard coding in between classes summed up in a few lines of text and a bunch of screenshots. Hope you all like the runthrough!

