EVK1101 Arrives
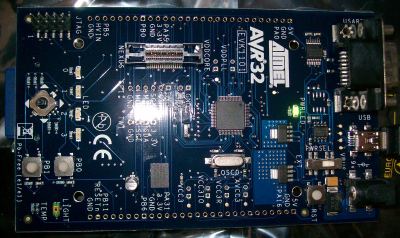
Hurrah! While I suspect DHL has lived up to my usual expectations by losing my now repaired Acer Aspire One (and not calling me back about it as promised), I did have a welcome package at my door today, containing my shiny new EVk1101:

Thanks to both Nico and Dave for their combined generous donation of the board. So far I’m yet to figure out how to even flash a LED (I can compile and program, but setting up the correct system clock, GPIO clock, GPIO outputs and all the rest needed to toggle an output is daunting. I prefer to work with the bare registers rather than with the framework, so that I can get real knoweldge of what’s going on at the hardware level (and also to reduce my code’s dependancies). Eventually, LUFA will be ported to the AT32UC3B chips.
The EVK is a fun little board, a bit like a souped up USBKEY. It includes a temperature sensor, light sensor (this isn’t a CDS cell like on most boards, but looks very much like an onboard LED – any clues what is is, anyone?) 2-axis accelerometer, SD/MMC card reader, four green LEDs, two pushbuttons and a joystick. This leads to many possibilities — half jokingly I suggested today a USB card reader whose transfer speed depends on how hard the board is shaked. Might make for an interesting project once LUFAs up and running on it ;).
But what’s the use of LUFA on the AVR32s, you ask, since it already has a framework which includes USB functionality? Basically, the main reason is for my education, to learn another architecture. However, there are also benefits to having alternatives – after all, Atmel already makes a AVR8 USB stack, but that didn’t stop me writing LUFA. Making LUFA multi-architecture will allow for people to switch between architectures while still keeping their USB knowedge current, rather than having to relearn each archtecture’s proprietary stack API.
Sadly it seems, no one is using AVR32’s at the bare metal, and are just using the UC3 frameworks. That’s a shame for “purists” like me who want to know exactly how the hardware works, and it’s making learning difficult. Still, it’s a great board and I’m excited to learn how it all works exactly.


Have fun with it. 😉
Here is some info about the light sensor
http://www.sparkfun.com/commerce/product_info.php?products_id=8348
Quote: “It includes a temperature sensor, light sensor (this isn’t a CDS cell like on most boards, but looks very much like an onboard LED – any clues what is is, anyone?)”
The obvious place to find out more about this is to look at the EVK1101 schematic: http://atmel.com/dyn/resources/prod_documents/EVK1101_Schematics_RevB.pdf
In the sensors section at page 5 you can see that D5 is named TEMT6000. By searching the internet you will find that TEMT6000 is made by Vishay.
Here’s that datasheet: http://www.vishay.com/docs/81579/81579.pdf
TEMT6000X01 Ambient Light Sensor
Forgot to add this:
Ambient Light Sensors – Product Overview: http://www.vishay.com/docs/49670/pl0366.pdf
Quote: “Part numbers with an X01 are qualified to the
AEC Q101 standard and support operating
temperatures from -40° to +100 °C”
And from the datasheet:
“DESCRIPTION
TEMT6000X01 ambient light sensor is a silicon NPN epitaxial planar phototransistor in a miniature transparent 1206 package for surface mounting. It is sensitive to visible light much like the human eye and has peak sensitivity at 570 nm.”
Sorry I made a typo, it’s D3 in the schematic, not D5.